
The Exposure Triangle: What I Wish Someone Had Told Me First

I have a confession.
For the first few weeks of shooting, I was leaving my camera on Auto and hoping for the best.
The photos were fine. Technically acceptable. But they looked like anyone's photos. There was nothing deliberate about them. The camera was making every decision, and I was just pointing and pressing.
The moment that changed was when I read three words: aperture, shutter speed, ISO.
Every single photograph you take is controlled by the relationship between those three things. Understanding how they work together, and what each one costs you when you change it, is the difference between taking a photo and making one.
That relationship has a name. It is called the Exposure Triangle.
What exposure actually means
Before anything else, let us talk about what exposure is.
When you press the shutter, light enters the camera and hits the sensor. Exposure is simply how much light the sensor receives. Too little light and the image is dark (underexposed). Too much and it blows out to white (overexposed).
The goal of every shot is to let in exactly the right amount of light for the image you want.
Here is a way to think about it. Imagine your camera is a bucket and light is water. The goal is to fill the bucket with just the right amount. Not too little, not overflowing. The three settings of the Exposure Triangle each control a different part of that process.
Aperture is the size of the tap. Wider tap, more water in faster.
Shutter speed is how long the tap stays open. Longer time, more water in.
ISO is how sensitive the bucket is to what enters it. A highly sensitive bucket fills faster, but the water may come out less clean. In photography, that means grain.
Change one of these and the others need to compensate to keep the exposure balanced. That is the triangle. They are always in conversation with each other.
Aperture: the opening in your lens
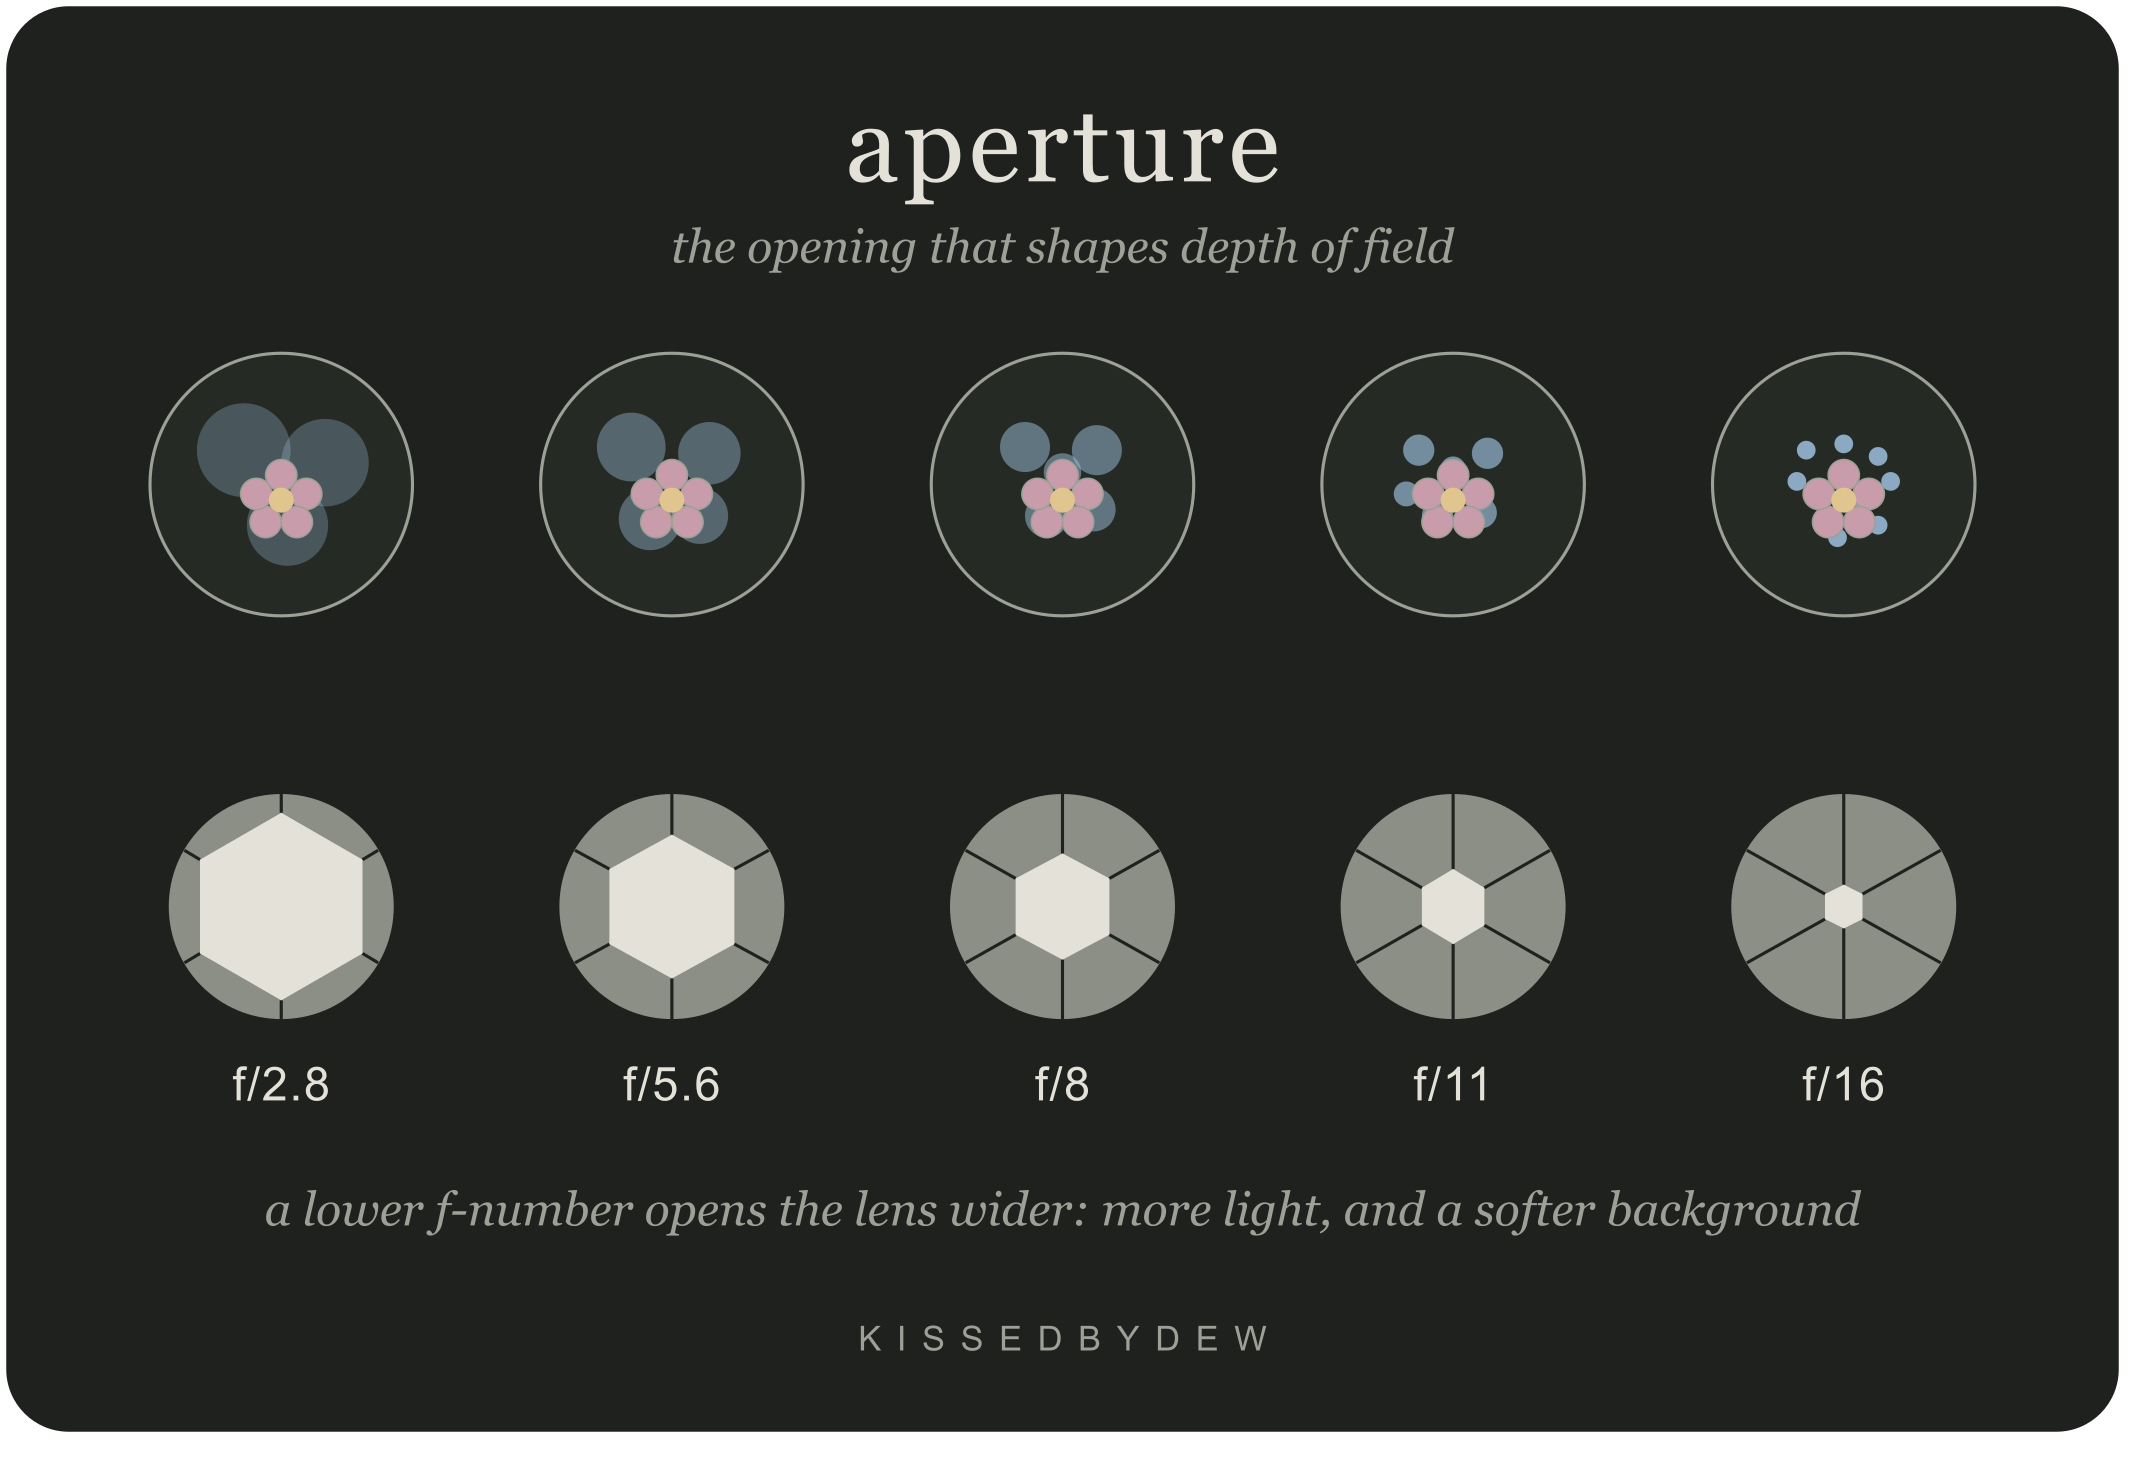
Your lens has an opening called the aperture. You can make it wider to let in more light, or narrower to let in less.
Aperture is measured in f-stops: f/1.8, f/2.8, f/4, f/5.6, f/8, f/11, f/16. Here is the part that trips almost everyone up at first: the smaller the number, the wider the opening. f/1.8 is a wide-open lens. f/16 is a very tight one.
The side effect of aperture is depth of field.
A wide aperture (small f-number) gives you a shallow depth of field. Only a thin slice of your scene will be in focus. Everything in front of and behind that slice falls away into soft blur. This effect is called bokeh, from the Japanese word for blur or haze, and it is one of the most sought-after qualities in close-up photography.
A narrow aperture (large f-number) gives you a deep depth of field. More of the scene is sharp, front to back. Useful for landscapes where you want the full scene in focus.
For macro photography, this is the setting I think about most. When I am inches from a butterfly wing, f/2.8 might give me sharp focus on a single vein while the rest of the wing goes soft. f/11 brings more of the wing into focus. Neither is wrong. They are different photographs. The choice depends on what story you want to tell.
The soft wash of color you see behind subjects in a lot of macro work is not accidental. It is a deliberate aperture choice, and it is one of the most powerful tools available to a macro photographer.
Shutter speed: how long the sensor sees the light
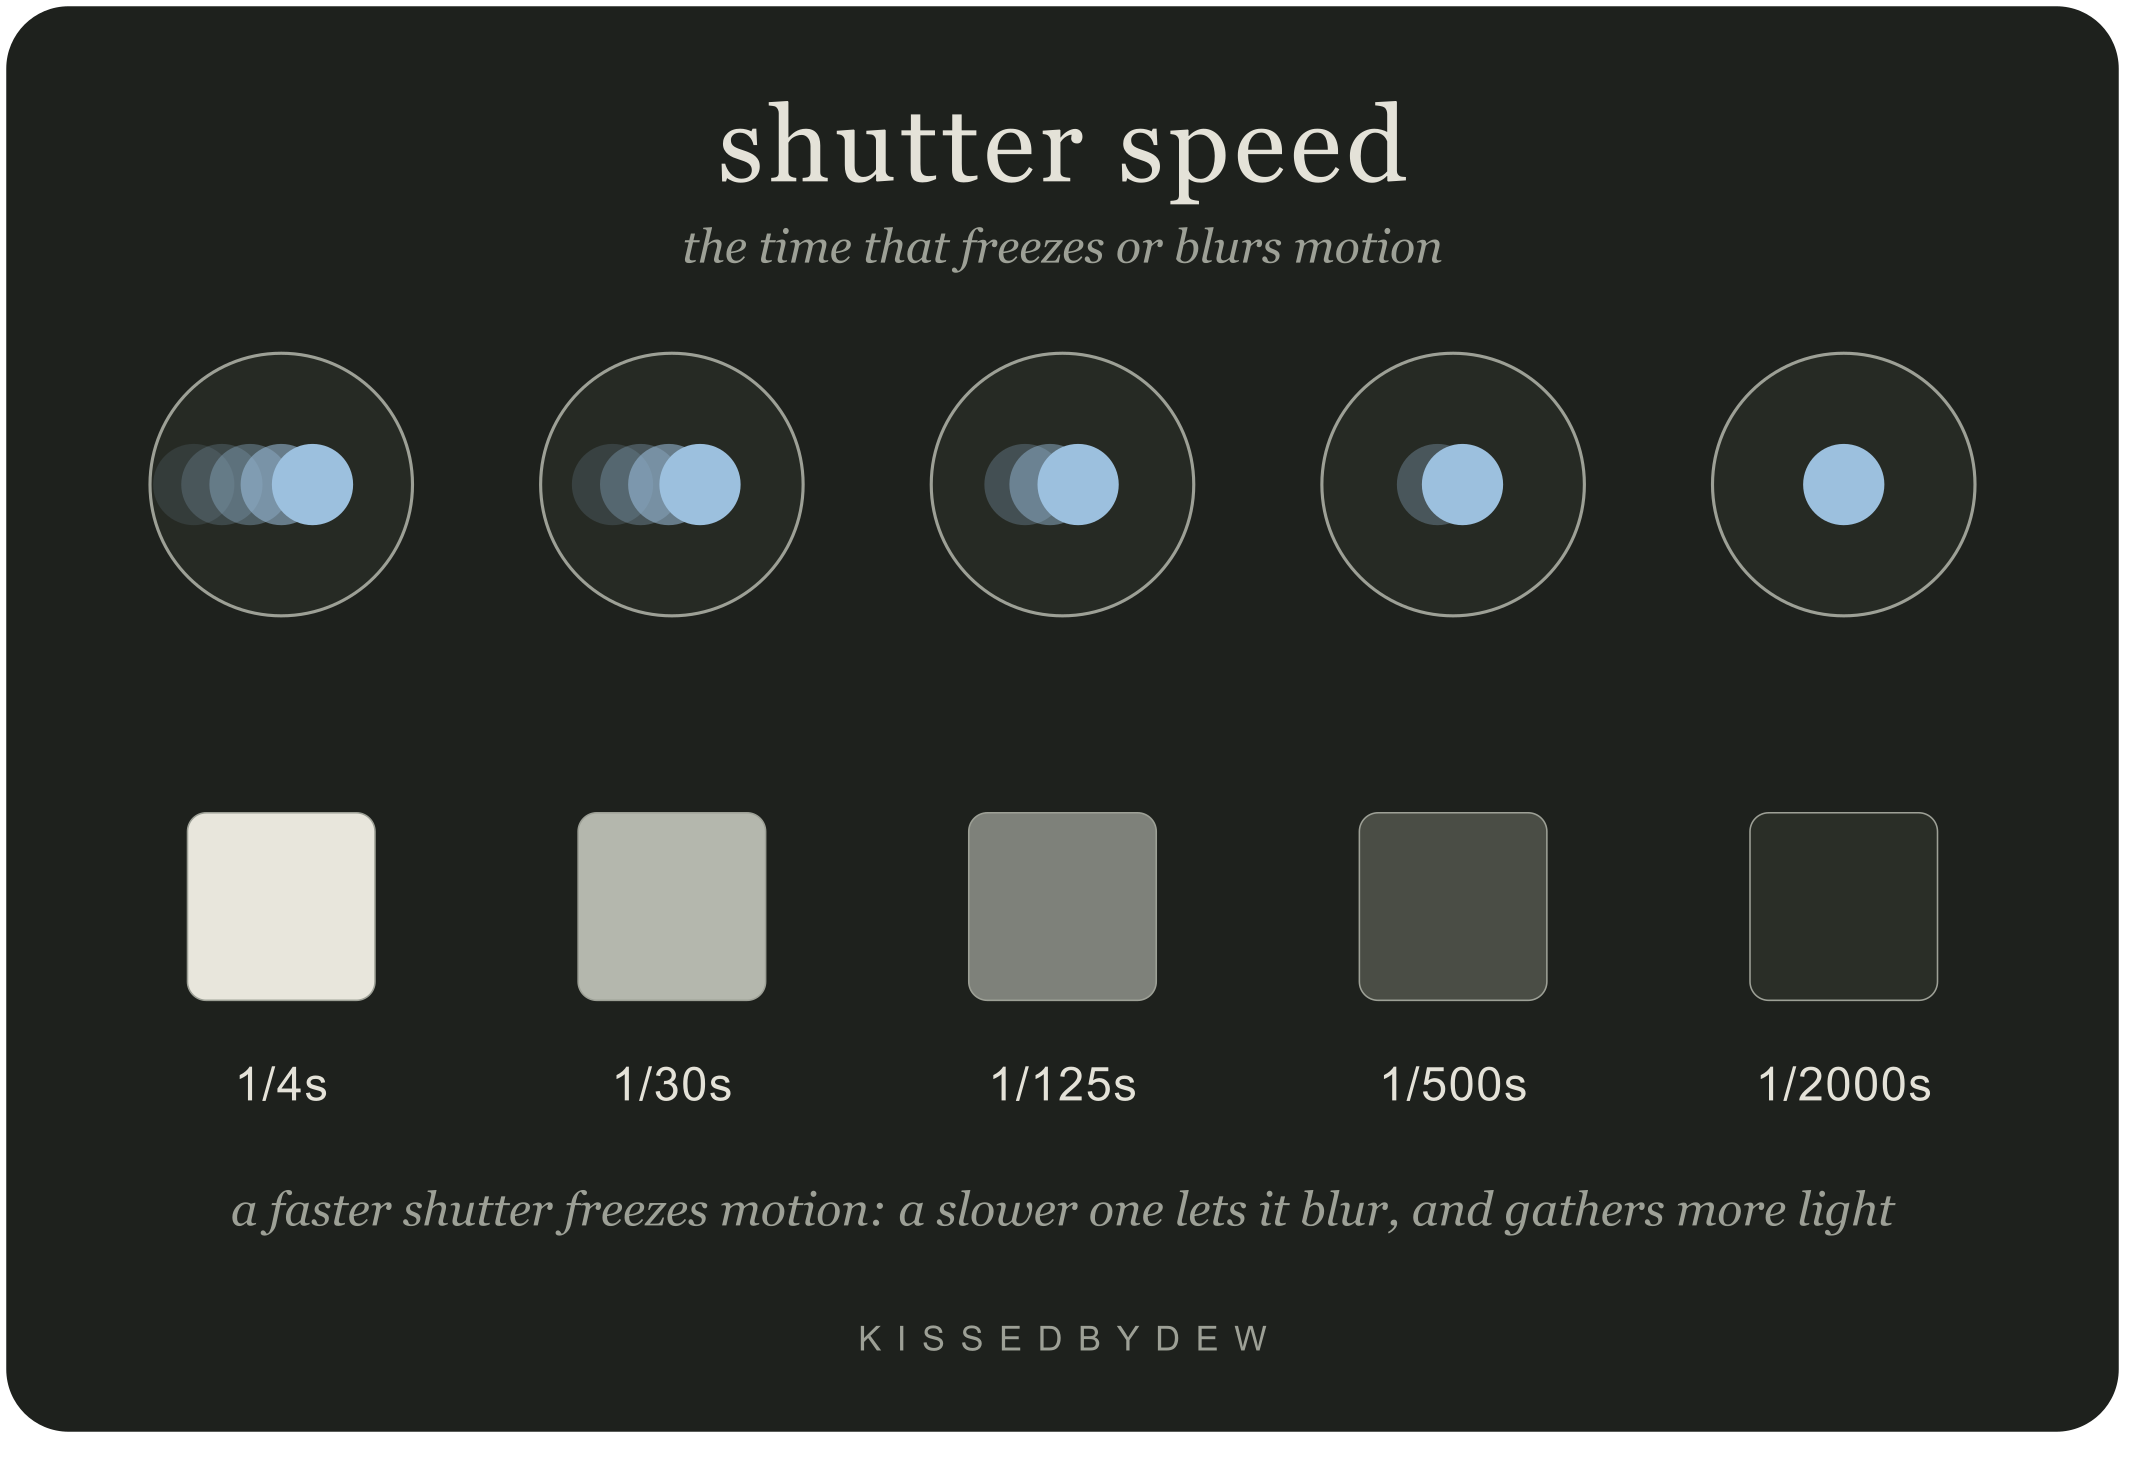
Shutter speed is how long the camera's sensor is exposed to light. It is measured in seconds or fractions of a second: 1/2000s, 1/1000s, 1/500s, 1/250s, 1/60s, 1/4s, and so on.
A fast shutter speed lets in light for a very short time. A slow shutter speed lets it in for longer.
The side effect of shutter speed is motion.
A fast shutter freezes motion. A dragonfly in flight at 1/2000s will be pin-sharp, wings suspended mid-beat. An athlete at 1/1000s caught in the air looks frozen in time.
A slow shutter blurs motion. Water becomes silk. A bee blurs into a suggestion of movement. Car headlights at night streak into trails of light across the frame.
For handheld shooting, there is a useful starting rule: try to keep your shutter speed no slower than the reciprocal of your focal length. Shooting a 100mm lens? Stay above 1/100s to avoid camera shake. Slower than that and you need a tripod.
On windy days with moving flowers and insects, I reach for a faster shutter even if it means sacrificing something elsewhere in the triangle. A technically noisy but sharp image beats a technically clean blur every time.
ISO: your sensor's sensitivity to light
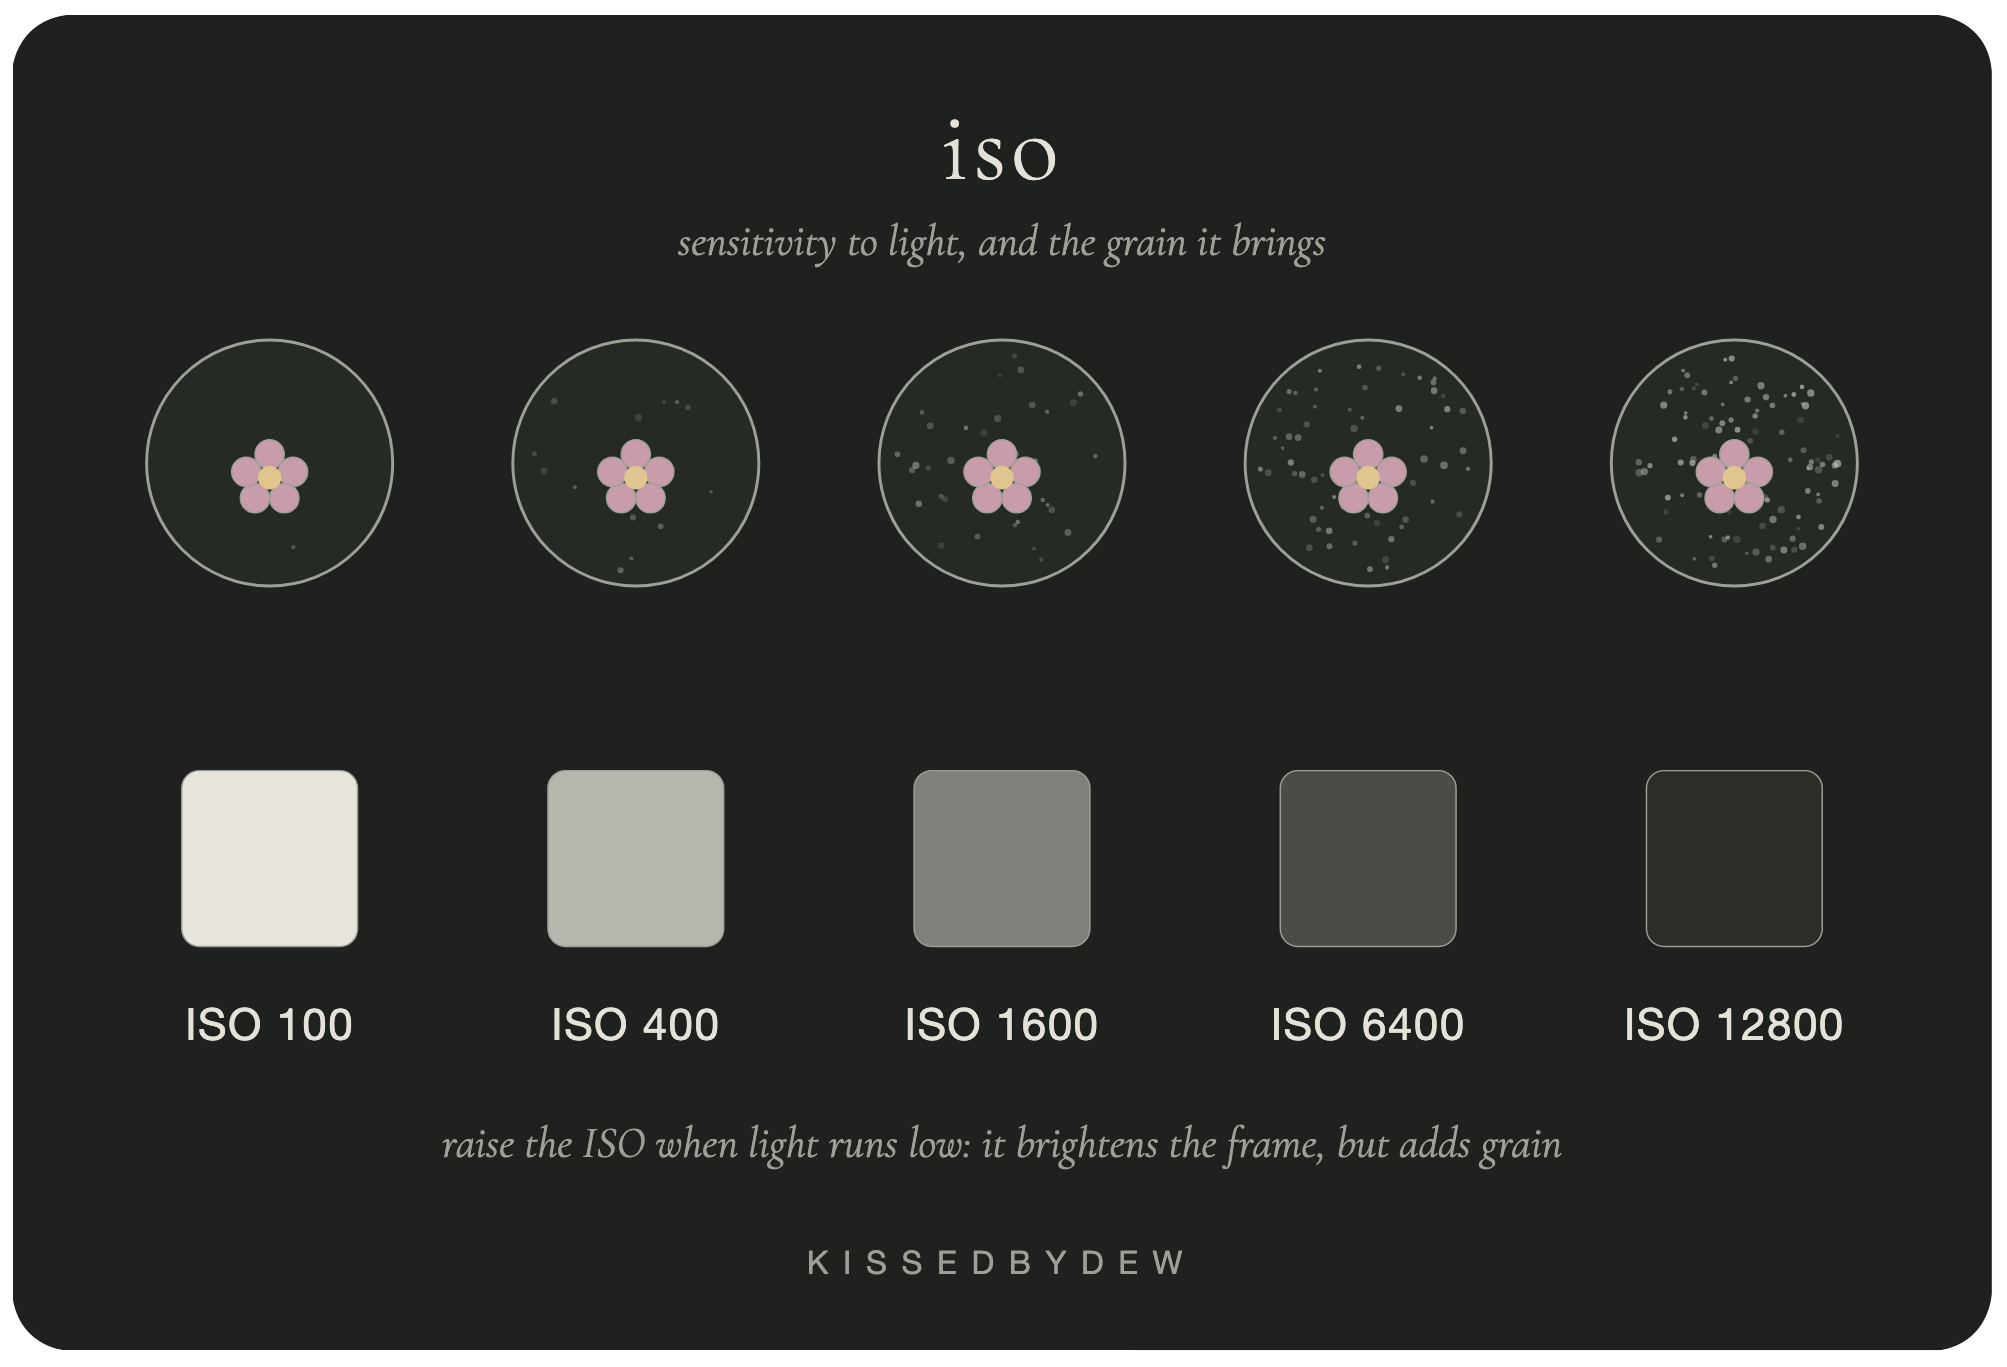
ISO stands for International Organization for Standardization, the body that created a standardized scale for measuring light sensitivity, originally for film and now adopted for digital sensors.
In practice, ISO controls how sensitive your camera sensor is to the light hitting it. Low ISO (100, 200) means the sensor is less sensitive and needs more light to make a proper exposure. High ISO (1600, 6400, 12800) means it is far more sensitive and can work in much dimmer conditions.
The side effect of ISO is noise.
Noise is that grainy, speckled texture you sometimes see in photos taken in low light. The higher the ISO, the more of it appears, especially in shadow areas. Modern cameras handle high ISO better than they used to, but there is always a point where it becomes distracting.
I treat ISO as the last lever I reach for. I set my aperture and shutter speed for what the image needs, then raise the ISO only as high as necessary to get the exposure right. If I need to push to ISO 3200 to capture a moth at dusk, that is the right call. Noise can be softened in editing, especially when shooting RAW files. A missed shot cannot be recovered at all.
A few ways to keep ISO in check:
Use a lens with a wide maximum aperture (f/1.8 or f/2.8) so you can let in more light without needing to raise ISO as high.
Shoot RAW instead of JPEG. RAW files hold more data and respond far better to noise reduction in software like Lightroom.
Learn your camera's limits. Test it by gradually increasing ISO in the same scene and look at the results at full resolution. Every camera has a comfortable ceiling. Once you know yours, you can set a maximum in auto ISO and trust it.
How the three work together
Here is where it clicks. These three settings are not independent. Change one and something else has to shift to maintain the same exposure.
Say I am photographing a dragonfly perched on a reed at 1/500s, f/5.6, ISO 400. The exposure is correct.
Now I decide I want more background blur, so I open the aperture to f/2.8. I have just let in significantly more light. The image will overexpose if I do nothing else.
To fix it, I can either increase my shutter speed to shorten the exposure time, or lower my ISO to reduce the sensor's sensitivity. Either brings me back to the correct exposure, but each has its own consequence for the image.
This is what it means to be in manual control. You are constantly balancing three variables, trading side effects, and deciding which tradeoff serves the photograph.
Practical settings for common situations
For macro and close-up work: Start at f/5.6 to f/8 for a reasonable depth of field without diffraction softening. Use ISO 400 as a starting point and adjust based on your shutter speed needs. Keep the shutter above 1/200s if your subject is moving at all.
For freezing fast motion (birds in flight, insects mid-air): Prioritize shutter speed. 1/1000s or faster. Open the aperture as wide as your lens allows and raise ISO until the exposure is correct.
For dreamy shallow-focus macro portraits: Start wide open (f/1.8 to f/2.8 depending on your lens). Keep ISO low (100 to 200) in good light. Use a shutter speed fast enough to freeze any subtle subject movement.
For low-light or indoor shooting: Open the aperture as wide as possible, slow the shutter speed as far as you can without introducing camera shake or motion blur, and raise ISO to bridge the gap. A tripod changes what is possible significantly in these conditions.
For landscapes where everything should be sharp: Use f/8 to f/11 for maximum depth of field. Tripod recommended. Keep ISO low for a clean image.
A simple way to start practicing
Go outside with one subject and shoot it thirty times.
Keep ISO fixed at 400. Change only your aperture and shutter speed and watch how the image changes. Shoot the same flower at f/2.8 and then at f/11. Notice what happens to the background. Notice what changes across the petals in focus.
Then keep aperture fixed and work through shutter speeds. Find the slowest speed you can handhold without blur. Watch what happens when something in the frame moves.
You are not trying to make great photographs yet. You are trying to build a physical memory of what each change actually does. That memory, built frame by frame, eventually becomes instinct.
The point is the intention
The Exposure Triangle is not a technicality to memorize. It is a vocabulary for intention.
When I look at a dragonfly on a stem and think "I want that background to dissolve behind it," I am thinking about aperture. When the wings start moving and I know I need to freeze them, I am thinking about shutter speed. When the light drops and I need to hold both of those settings where they are, I reach for ISO.
Every choice in the frame starts here.
That is why this is the first thing I wanted to write down.
KissedByDew is a nature and macro photography brand based in Washington DC and Northern Virginia. I am documenting what I learn here as I learn it. If you are starting out too, I hope it helps.